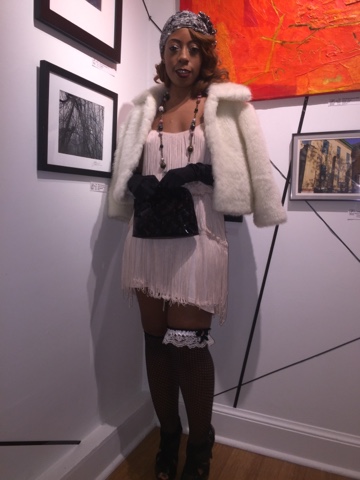
ITS AMAZING HOW CRAFTY YOUR HANDS CAN BE WHEN YOU PUT YOURSELF IN A CREATIVE MINDSET! LIKE THIS PROJECT I DID FOR A CLIENT OF MIND, WHICH WAS A FIRST TIMER FOR ME.
THE SCENARIO:
Last few weeks around Halloween, I was a Flapper from the Great Gatsby movie. Showcased the whole 1920s look and post on media. It was then one of my friend/client reached out to me and needed this look for a theme company party. They were confused on where to start. Because I had a liking to the 1920s fashion era, I took upon myself to help style to create the theme look. After finding just about everything, she needed a headpiece to complete the whole outfit. I knew it was going to be almost impossible to find at the last minute, I challenged myself on making the "Perfect DIY 1920s Flapper Headpiece"
HAD NO INTENTIONS ON HOW I WOULD START, BUT I KNEW MY TRUSTY GO-TO APP(Pinterest) WOULD BE OF SERVICES. SKIMMING THROUGH IMAGES ON PINTEREST.....MY SENSE OF DIRECTION BECAME MUCH VIVID AND I PICTURED THIS IDEAL LOOK IN MY HEAD AND CREATED A MASTERPIECE WITH MY HANDS.
HERE'S STEP BY STEP ON PERFORMING DIY 1920s HEADPIECE:
–The Starter
Favorite go-to Craft store{Michaels&Jo-Ann Fabric}
Supplies:
•Glue Gun and Glue Sticks
•Pack of sequins(any color you choose)
•Detailed Feathers
•1 Roll or 2 Rolls of Detailed Ribbon of your choice
•1 Pack of Adhesive Rhinestones
•Pack of String Beads
.....and don't forget your trusty ole Pinterest app to guide you on the Perfect Headpiece.

–Let's Begin!
Now that you have all the supplies you need, Let's Start.....
1. First measure ribbon around your head for the perfect sizing. Then, proceed to cut the ribbon for the actual length.
2. Hot glue the top layer of lace ribbon onto bottom layer of sheer or velvet ribbon(shown on picture)


5. Begin applying the smaller contrasting feathers underlaying them under the peacock feathers and black feathers, by hot gluing a small or a subtle amount for a cleaner finish.

6. When completed, the results of your new detailed Peacock feathers should look close to this. You have the option to place them in any area under peacock for the particular style you want. I chose to use darker color(Rust Red feathers) for more of a dramatic look.
What you think?

7. Next step, Embellished time! This particular task is optional, if don't want to add more details to feathers....then you can skip this step. Want to go this route, proceed to use the pack of Black&Grey adhesive Rhinestones. You can pick and choose where to place stones in whatever size you want to use.

7. Now that your headpiece is completed and your accent feather is done as well, it's time to add a little Sparkle to headpiece!

Using my sequin packet from Michaels fabric store, applied a small amount of glue on top of the trimmed lace ribbon. Proceeded to add sequin covering the glue spotted areas of band for that flashy flapper style. Hot glue ribbon on the ends of band for more of an adjustable fit around the crown of your head. This is just for a secure look to tie the headpiece on and off.


9. Lastly, final touches with the string of beads tucked under feather with a little glue holding. Once it's all done, this is how the finishing product should be close to:
–The Finishing


TWO-PIECE FEATHER HEADPIECE
Steps a little simple on this particular band....
Supplies:
•1Pack of White Feathers(Michaels Fabric Store)
•Detailed Black feather piece
•1 Pack of Black Sequins
•1 Pack of Adhesive Rhinestones
•1 Roll of Silver/Black Rhinestone ribbon
•1 Roll of Solid Black ribbon


1. Lay out your supplies! Begin to do Step....
1. First measure ribbon around your head for the perfect sizing. Then, proceed to cut the ribbon for the actual length
2. Secondly,
Hot glue entire Rhinestone ribbon on top of Solid color Black ribbon. It should be 2 of the Rhinestones bands(shown on picture below)
4. Place both bands on head to create that two-piece style. One band around the crown of head starting from forehead and back...tying it securely. The second band place on crown over top of the first one, measuring from one side of the ear to the other.
5. As you noticed, this particular band maybe a little shorter than the first one. Once measured properly, proceed to cut the extra material off.
6. After cutting, hot glue the ends of the shorter band under the longer band. Make sure you leave a little space in between the 2 bands to show off the double look once placed on crown of the head.
7. When completed the starter band, next, add white feathers on the detailed black feather band(the material that hold the black feathers into place)
8. When done, hot glue Rhinestone ribbon on opposite side where the white feathers were placed on detailed one. This is to cover the material on black feathers for a more polished look.
9. Almost finished.....begin to tie headpiece on head to your comfort. Once that's done, figure out the placing for your Embellished feather and remove band.

10. Once you found where to place Embellished feather, start gluing band to the detailed piece securely. After finishing....
This is the end result...
–The Finishing


I WAS EXCITED OF THE OUTCOME , AS WELL AS MY CLIENT! SHE'S NOW FLAPPER READY!
HOPE YOU FASHIONISTA FOUND THIS DIY 1920s CUSTOM HEADPIECE A FUN PROJECT TO DO AS I DID!
Let's see you give it a Try!...
Email me your version Kreatorstyles@gmail.com
Or post on Instagram and hashtag #kreatorstylesheadpiece


 Richard Chai S/S, Acne Resort, Dries van Noten S/S runways, respective images the trend has been revealed since 2011.